AWS Step-by-Step
Getting Started with Amazon Simple Notification Service
The Amazon Simple Notification Service (or SNS, as it is commonly called) is an Amazon Web Services (AWS) solution that is designed to push notifications to mobile devices.
Although SNS can be used as a text messaging engine, it also has less obvious uses. For example, most operations that are performed in Amazon Glacier are performed as jobs, and SNS can be used to notify an administrator when a job has completed.
In case you are wondering, there is a fee for using SNS. However, there are no upfront costs and the usage costs are lower than you might expect. Mobile push notifications are currently billed at a rate of $0.50 per million (yes, that is correct). Free-tier users receive 1 million push notifications included with their subscription. There can be additional costs for delivering other types of notifications such as e-mail, HTTPS or worldwide SMS.
You can find the complete pricing structure here. Incidentally, that page also includes a cost calculator that you can use to estimate the cost of pushing SNS notifications.
AWS makes it easy to work with SNS. The key thing that you have to understand about SNS usage is that SNS is a very diverse tool. As such, the usage steps will vary depending on what you are trying to accomplish. I already mentioned, for example, that SNS can be used to receive notifications from Glacier, and that it can be used to send text messages. However, SNS can also be leveraged by your own applications, thereby allowing those applications to send notifications.
You can access SNS by logging into the AWS console and clicking on the SNS link found on the home screen. The link is located in the Mobile Services section. This will take you to the SNS dashboard, shown in Figure 1.
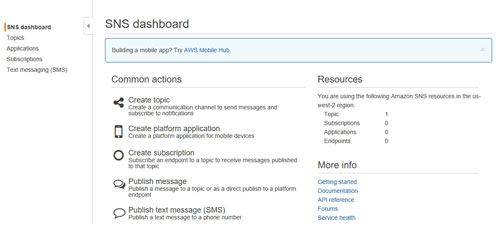 [Click on image for larger view.] Figure 1: This is the SNS Dashboard.
As you can see in the figure above, the dashboard is pretty straightforward. It provides links to five primary SNS actions. One thing to be sure to pay attention to on this screen is the Resources section. This section lists the region within which you are working. It is important to always be aware of your region since you may need to match the region to that of other resources that you are using in conjunction with SNS.
The first of the common actions listed on the dashboard is Create Topic. Clicking on Create Topic causes the console to display the Create New Topic dialog box, shown in Figure 2.
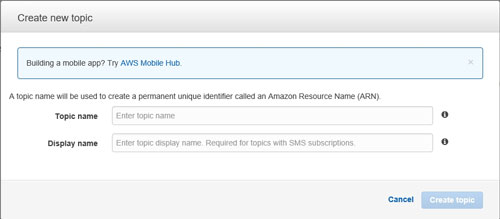 [Click on image for larger view.] Figure 2: Topic names are essentially just unique resource identifiers.
A topic is really just an identifier. It's a name that identifies a specific resource within the AWS cloud. This name is referred to as an Amazon Resource Name. As you can see in the figure above, there isn't much involved in populating this dialog box. You must simply enter a topic name and a corresponding display name.
The next option on the SNS dashboard is Create Platform Application. This option is used to enable SNS notifications for an application. As you can see in Figure 3, associating SNS with an application requires the administrator to provide four pieces of information -- the application name, the push notification platform to be used, and a client ID and client secret that act as the application's credentials for connecting to the push notification platform that has been selected.
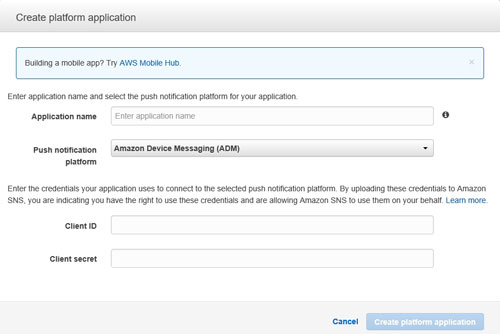 [Click on image for larger view.] Figure 3: This is the interface used to enable SNS notifications for applications.
Another common action is to create a subscription. I previously mentioned the creation of topics, but I didn't really say what topics are used for. Think of a topic as a communications channel. The Create Subscription interface, which you can see in Figure 4, is used to subscribe endpoints to a topic. That way, messages that are published to the topic will be transmitted to all of the subscribed endpoints. As you can see in Figure 4, creating a subscription involves selecting a topic and protocol, and entering an endpoint URL.
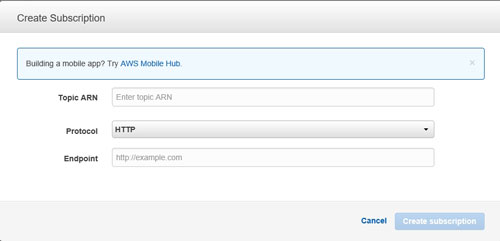 [Click on image for larger view.] Figure 4: Endpoints can be subscribed to a topic.
As I hinted in the previous paragraph, another common action is that of publishing a message. Clicking on the Publish Message link causes the console to display the dialog box shown in Figure 5. As you can see in the figure, this interface requires you to enter the target Amazon Resource Name, your message, and to specify whether your message is in text format or JSON format.
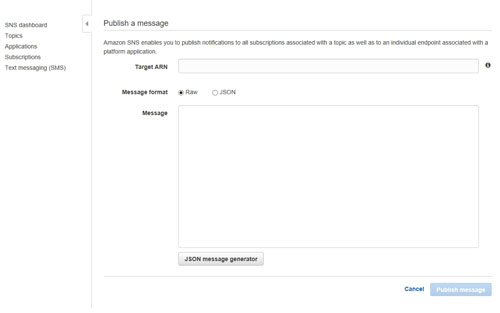 [Click on image for larger view.] Figure 5: Specify the target ARN and enter your message.
The last of the common actions is publishing a text message. Publishing a text message is similar to publishing other types of messages, except that you don't have to enter an Amazon Resource Name. Instead, you must provide the target phone number. You will also need to specify the message type, sender ID and, of course, your message. You can see what this looks like in Figure 6.
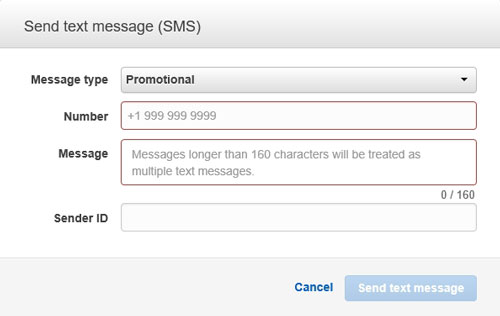 Figure 6: AWS can send text messages.
SNS is different from some of the other AWS features in that it is more like a collection of tools than a single feature. These tools can be used to produce push notifications for a variety of different purposes.
About the Author
Brien Posey is a 22-time Microsoft MVP with decades of IT experience. As a freelance writer, Posey has written thousands of articles and contributed to several dozen books on a wide variety of IT topics. Prior to going freelance, Posey was a CIO for a national chain of hospitals and health care facilities. He has also served as a network administrator for some of the country's largest insurance companies and for the Department of Defense at Fort Knox. In addition to his continued work in IT, Posey has spent the last several years actively training as a commercial scientist-astronaut candidate in preparation to fly on a mission to study polar mesospheric clouds from space. You can follow his spaceflight training on his Web site.