AWS Step-by-Step
Getting Started with Amazon WorkMail
There are a number of different options available to organizations that want to host corporate e-mail in the cloud. An organization could, for example, subscribe to Microsoft Office 365 or opt to deploy their own mail server onto a cloud-based virtual machine instance. And, of course, there is always the option of using one of the free mail services.
For Amazon Web Services (AWS) subscribers, however, one particularly nice option is Amazon WorkMail.
WorkMail is a managed e-mail and calendaring service that is part of the AWS portfolio. You can access WorkMail by signing in to the AWS console and choosing the WorkMail option from the list of available services (it's located in the Business Productivity section). Upon doing so, you will be taken to the WorkMail screen, shown in Figure 1.
 [Click on image for larger view.] Figure 1: This is where you go to get started with Amazon WorkMail.
Click on the Get Started button, and you will be taken to a screen that asks if you want to perform a quick setup, or if you would prefer to perform a standard setup. You can perform a quick setup in under two minutes.
As appealing as that may be, however, the quick setup option is rarely appropriate for use in production environments. The reason for this is that the quick setup option does not allow you to use an existing directory, domain name or KMS key. As such, the quick setup option is great for trying out the service in a lab environment, but you probably won't want to run your organization's mail from it.
There is, however, one caveat to this statement. You can use quick setup to create a lab environment, and then eventually convert the lab environment into a production environment by adding a domain and other resources. You can see the difference between the quick setup and standard setup in Figure 2.
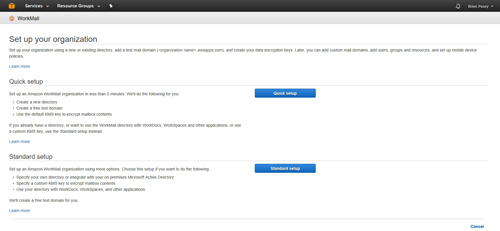 [Click on image for larger view.] Figure 2: You can opt to perform either a quick setup or a standard setup.
Regardless of whether you opt to perform a quick setup or a standard setup, the set up process is really simple. If you choose the quick setup option, you will be taken to the screen shown in Figure 3 below. As you can see in this figure, the quick setup option only requires you to enter your organization name and to click the Create button. You can also see that AWS states, "The setup process takes around 2 minutes. Mailboxes will be encrypted with the Service Default Key in your account. Later, you can manage your organization by adding mail domains, users, groups and resources, and mobile device policies."
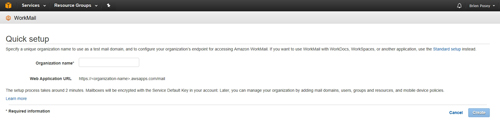 [Click on image for larger view.] Figure 3: The only piece of information that you will need to provide when performing a quick setup is the name of your organization.
Although it is easy to assume that performing a standard setup will be more complex than performing a quick setup, even a standard setup is relatively effortless. At least, that is the case if you have already provisioned AWS with a directory, an encryption key and a domain name. Otherwise, there is a bit of prep work that you will need to do ahead of time.
Assuming that these elements are already in place, however, the setup process is really easy. If you look at Figure 4, you can see that performing a standard setup only requires that you select the directory that you want to use, and then select the key that you wish to use as a master encryption key. After doing so, you can simply click the Create button to set up WorkMail.
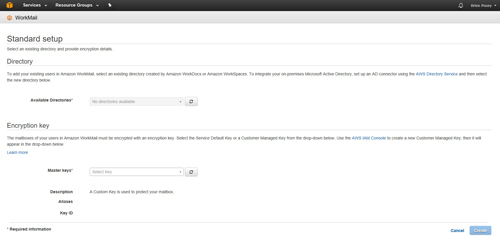 [Click on image for larger view.] Figure 4: Here is what a standard setup looks like.
For the sake of demonstration, I will go ahead and perform a quick setup. As previously mentioned, this only requires you to provide the name of your organization. Upon doing so, AWS will use your organization name to create a custom Web application URL. For example, I entered PoseyLabs as the organization name, and AWS set my URL to be https://PoseyLabs.awsapps.com/mail.
Clicking Create will take you to a screen that's similar to the one shown in Figure 5 below. You will need to wait for the setup process to complete before you attempt to do anything else. The Web console tends not to update itself automatically, so you will need to refresh the console to see if the process has completed.
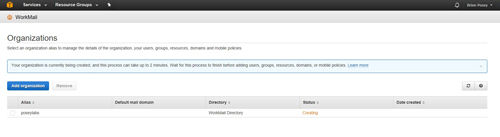 [Click on image for larger view.] Figure 5: Make sure that the directory has been created before you attempt to use the mail environment.
Once the creation process completes, the screen shown in Figure 5 will display a status of Active, and you will be able to click on the alias to begin managing your newly created environment.
About the Author
Brien Posey is a 22-time Microsoft MVP with decades of IT experience. As a freelance writer, Posey has written thousands of articles and contributed to several dozen books on a wide variety of IT topics. Prior to going freelance, Posey was a CIO for a national chain of hospitals and health care facilities. He has also served as a network administrator for some of the country's largest insurance companies and for the Department of Defense at Fort Knox. In addition to his continued work in IT, Posey has spent the last several years actively training as a commercial scientist-astronaut candidate in preparation to fly on a mission to study polar mesospheric clouds from space. You can follow his spaceflight training on his Web site.