AWS Step-by-Step
Using AWS for Video Transcoding, Part 2
Now that you've set up the Amazon S3 bucket for your video transcoding project, it's time to actually convert the video. That's often easier said than done.
In my previous article in this series, I showed you how to set up the Amazon Web Services (AWS) Simple Storage Service (S3) buckets that are required by a video transcoding project. Now that the storage buckets are in place, let's convert a video.
The first thing that you will need to do is upload one or more videos to the source bucket that you created. To do so, log in to the AWS console, open the Amazon S3 dashboard, and then click on your source bucket. Upon doing so, you will be taken to a dashboard view of the bucket. Click the dashboard's Upload button, and then follow the prompts to upload a video file. The upload wizard presents you with a number of different options, but in most cases you should be able to use the default.
This brings up an important point. Video files can be super tricky to upload to S3 buckets. Often times, the upload will fail, seemingly without reason. If you have this problem, then there are a couple of things that you can try. First, check your PC to make sure that it has the correct time. Uploads will fail if your PC's clock is different from AWS' clock. Another thing that you can do is try uploading a non-video file. Uploading a document file or something similar will allow you to verify that the bucket is working.
If you find that video files are failing to upload, but that other file types upload successfully, then it is possible that the video file is missing a frame or two. Some people have had success with rewriting the video prior to uploading it.
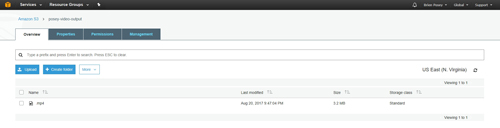
Once you get your video to upload, you should see the video listed within the bucket, as shown in Figure 1.
 [Click on image for larger view.] Figure 1: The video file is displayed within the bucket.
Now, go to the list of AWS services and choose the choose the Elastic Transcoder option. It's located in the Application Services section. When you do, you will be taken to the Amazon Elastic Transcoder screen shown in Figure 2.
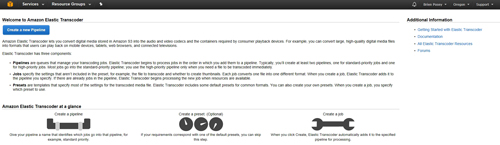 [Click on image for larger view.] Figure 2: This is where you go to transcode a video.
The first step in transcoding a video is to create a pipeline. To do so, click on the Create a New Pipeline button, shown in Figure 2 above. This will take you to the Create New Pipeline screen.
Although this screen asks for quite a bit of information, populating the required fields is relatively easy. To begin, you will need to name the pipeline, and then select your input bucket and IAM role. Next, choose the output bucket and its storage class. Finally, choose a bucket and storage class for video thumbnails. There are a couple of optional configuration items at the bottom of the screen, but you don't have to use them unless you want to enable notifications or encryption. You can see what the configuration looks like in Figure 3.
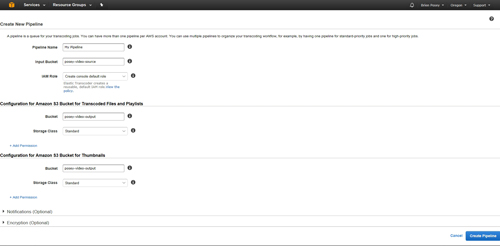 [Click on image for larger view.] Figure 3: This is how you create a pipeline.
Click the Create Pipeline button and you will be taken to a screen that displays the pipeline. Now, click on the Create New Job button to begin setting up a transcoding job. As you can see in Figure 4 below, this screen contains lots of options, but you are only required to use a few of them. Specifically, you will need to select the pipeline that you want to use, the name of the file that you want to transcode, and the output preset that you want to use. You will also have to specify an output key, which is usually just a file name with an extension (such as .MP4).
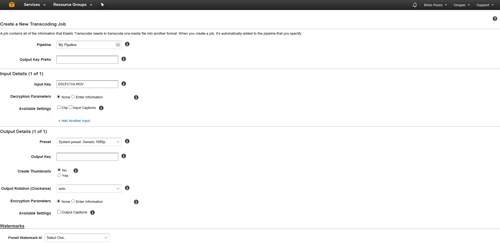 [Click on image for larger view.] Figure 4: Select the pipeline, file name and output preset.
When you are done, click the Create New Job button.
At this point, the job will run. AWS will display the job on the Jobs screen, but this screen does not refresh in real time. You will have to periodically click the Refresh button to check on the status of your job. Eventually, however, the job will show a status of Complete, as shown in Figure 5.
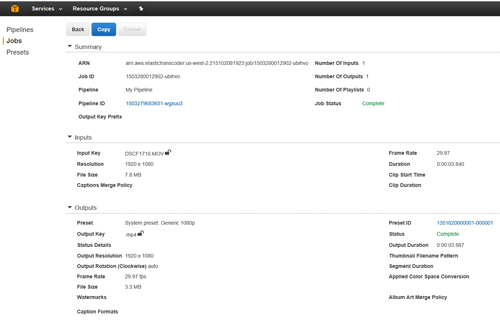 [Click on image for larger view.] Figure 5: The job is complete.
The transcoded video should appear in your output bucket, as shown in Figure 6. Now you can download the video file or transfer it to another bucket, depending on your own needs.
 [Click on image for larger view.] Figure 6: The newly transcoded video is listed in the output bucket.
About the Author
Brien Posey is a 22-time Microsoft MVP with decades of IT experience. As a freelance writer, Posey has written thousands of articles and contributed to several dozen books on a wide variety of IT topics. Prior to going freelance, Posey was a CIO for a national chain of hospitals and health care facilities. He has also served as a network administrator for some of the country's largest insurance companies and for the Department of Defense at Fort Knox. In addition to his continued work in IT, Posey has spent the last several years actively training as a commercial scientist-astronaut candidate in preparation to fly on a mission to study polar mesospheric clouds from space. You can follow his spaceflight training on his Web site.