AWS Step-by-Step
Pushing a Docker Image to the EC2 Container Registry
It's one thing to set up a simple application container, and another to be able to actually use containers in the real world. To do that, you'll need to know how to push a Docker image to AWS.
In a recent article series, I explained how to use Amazon Web Services' EC2 Container Service (ECS) to deploy a very simple application container. However, while deploying a sample application is a good start, it's something that you are unlikely to do in the real world.
If you are planning to use containers in production, then you will need to know how to push a Docker image to AWS. In this article, I will show you how it's done.
Before I get started, I need to mention a couple of prerequisites. First, I am assuming that you actually have a container image that you want to push to AWS. Second, I am assuming that you have both Docker and the AWS Command Line Environment (CLI) installed on your local environment.
So with that said, let's get started.
The first thing that you need to know about the process of pushing container images to AWS is that container images are stored in a container repository within the AWS cloud. AWS lets you use the GUI to create a container repository, but adding images to that repository requires you to delve into the command line.
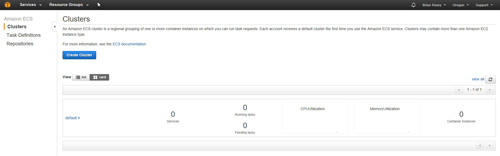
To create a container repository, log in to the AWS console, and choose the EC2 Container Service option from the list of services. This option is located in the Compute section. This will cause AWS to open the Clusters dashboard. If you look at Figure 1, you will notice that this dashboard contains a Repositories tab, located on the left side of the screen. Go ahead and click on Repositories.
 [Click on image for larger view.] Figure 1: Click on the Repositories link.
At this point, you will be taken to the Repositories screen, which you can see in Figure 2. As you can see, this screen is pretty simple. It lists any existing repositories and contains buttons that you can use to create or delete repositories.
 [Click on image for larger view.] Figure 2: This is the Repositories screen.
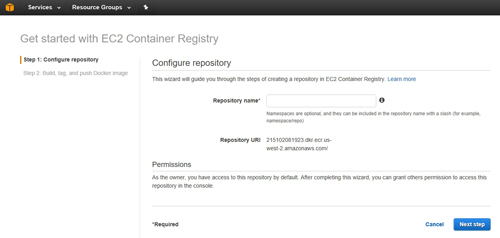
Go ahead and click on the button to create a repository. Upon doing so, you will be taken to a screen like the one shown in Figure 3. Now, just enter a name for the repository that you want to create and click the Next Step button. Upon doing so, the repository will be created.
 [Click on image for larger view.] Figure 3: Enter a name for the repository that you want to create and click the Next Step button.
Before I move on, there are a couple of things that I want to point out about this screen. First, notice that AWS lists the repository URI. After you type the repository name, it is a good idea to write down the URI before you click Next Step.
The other thing worth noting is that according to the screen, the repository owner (you) has access to the repository by default, but you will need to grant access to anyone else who needs it.
At this point, the container repository is created. Authenticating your Docker client into this registry is a little bit tricky, but AWS does provide some instructions on the next screen. The first step in the process is figuring out the command that is used to log in. AWS provides you with a command that you can use to retrieve the log-in command. It looks similar to this:
aws ecr get-login --no-include-email --region us-west-2
Next, you will need to log in. If you are on a Linux system, then you will need to run the command that was returned by the previous command. If you are on a Windows system, then AWS provides a PowerShell command that you can use instead. The example PowerShell command that AWS provides is:
Invoke-Expression -Command (aws ecr get-login --no-include-email --region us-west-2
The next step in the process, as listed by the instructions, is to build the Docker image. The command provided by AWS is:
docker build -t sample .
You will notice that this command (and the next two commands) uses the word Sample. Sample is the name of my repository, so the commands will be a little bit different in your environment.
Now, you will need to tag the image and upload it to the repository. The commands that AWS provides for doing so are:
docker tag sample:latest 215102081923.dkr.ecr.us-west-2.amazonaws.com/sample:latest
docker push 215102081923.dkr.ecr.us-west-2.amazonaws.com/sample:latest
If you would like to see what these instructions look like in their entirety, then check out Figure 4. This is the screen that AWS displays after you create a repository.
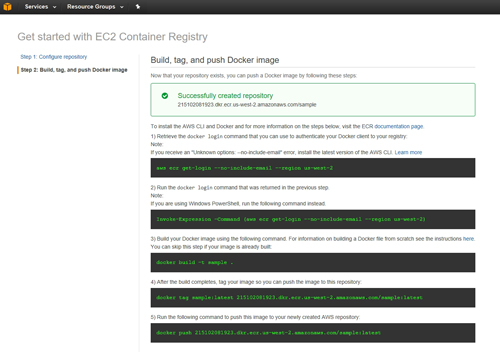 [Click on image for larger view.] Figure 4: AWS displays these instructions after you create a container repository.
As you can see, the process of setting up a repository and uploading a container image is relatively easy. If you need help, though, AWS provides detailed instructions here.
About the Author
Brien Posey is a 22-time Microsoft MVP with decades of IT experience. As a freelance writer, Posey has written thousands of articles and contributed to several dozen books on a wide variety of IT topics. Prior to going freelance, Posey was a CIO for a national chain of hospitals and health care facilities. He has also served as a network administrator for some of the country's largest insurance companies and for the Department of Defense at Fort Knox. In addition to his continued work in IT, Posey has spent the last several years actively training as a commercial scientist-astronaut candidate in preparation to fly on a mission to study polar mesospheric clouds from space. You can follow his spaceflight training on his Web site.