AWS Step-by-Step
Accessing Amazon S3 Buckets Through Visual Studio, Part 1
In the first of this two-part series, Brien lays the groundwork for gaining access to S3 using the AWS Toolkit for Microsoft Visual Studio.
Amazon Web Services (AWS) often serves as a platform for running custom-built apps in the cloud. This, of course, means that developers will need to create Elastic Compute Cloud (EC2) instances (a.k.a. virtual machines), and then log in to those instances in order to configure them to run the required app.
In some cases, however, interacting directly with an EC2 instance may not be enough. There is sometimes a need to access an Amazon Simple Storage Service (S3) bucket independently of an EC2 instance. In this article, I will show you how to do this using Microsoft Visual Studio.
For the purposes of this column, I am going to assume that you already have an S3 bucket and that you need to be able to access that bucket through Visual Studio.
The first thing that you will need to do is to download the AWS Toolkit for Visual Studio; you can access the current version here. It is worth noting that this version is intended for use with versions of Visual Studio that are newer than 2012. If you are using Visual Studio 2012 or earlier, then you will need to download one of the legacy versions from the download link above.
For the most part, installing the AWS Toolkit is a really straightforward process. However, there is one aspect of the installation process that you will need to pay attention to. The AWS Toolkit is made up of a number of sub-components. One of those components is called AWS Toolkit for Visual Studio, and this component contains the necessary tools for gaining access to S3. I have found that although it is not consistent, sometimes this component is not selected by default for installation, as shown in Figure 1. Be sure to enable this component before completing the Setup Wizard.
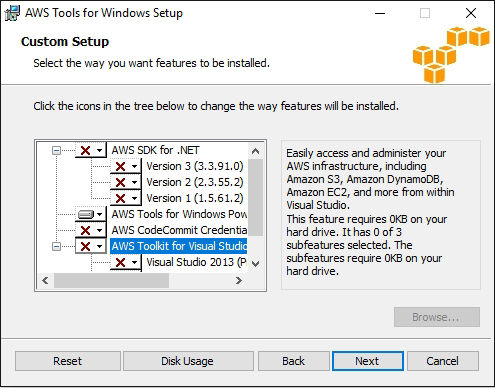 Figure 1: You will need to install the AWS Toolkit for Visual Studio.
The next step in the process is to create an IAM account, through which Visual Studio can access AWS. To create the required account, log in to the AWS console and go to the home screen where the various services are listed. Next, locate the Security, Identity and Compliance section, and click on the IAM link. This will take you to the console's Identity and Access Management screen.
At this point, you will need to click on the Users container, located in the console tree on the left side of the screen. Next, click the Add User button, which you can see in Figure 2.
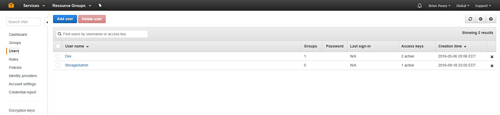 [Click on image for larger view.] Figure 2: Click on the Add User button.
You will now be taken to the Add User screen. This screen requires you to provide a name for the user account that you are creating and to specify the type of access that the user will need. At a minimum, this account will need programmatic access, as shown in Figure 3.
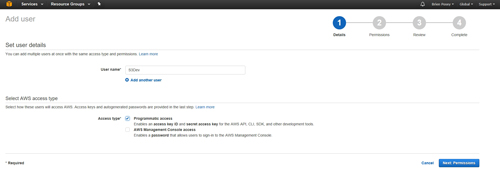 [Click on image for larger view.] Figure 3: The account will need programmatic access to AWS.
Click the Next button, and you will be taken to the Permissions screen. The option to add the user to a group is selected by default, and if you have previously set up an administrative group, then you can certainly use it. The other option is to click on the Attach Existing Policies Directly icon, and then select the AdministratorAccess policy, as shown in Figure 4.
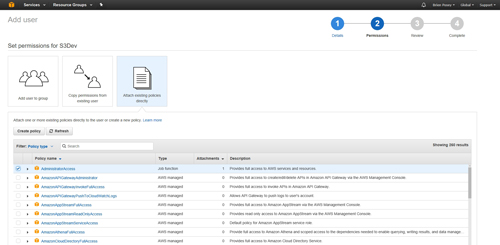 [Click on image for larger view.] Figure 4: You will need to grant administrative permissions to the user account.
Click Next, and you will be taken to a screen that gives you the chance to review the user account settings. Assuming that everything looks good, click on the Create User button to create the account.
When the account is created, you will be taken to a screen that displays the Access Key ID and the Secret Access Key for the account. It is very important that you take the time to document these keys, because AWS will not show them to you again, and you are going to need the keys in order to link Visual Studio to AWS.
When I have had to document AWS keys in the past, I have found that the easiest technique (at least for me) is to copy and paste the keys into Notepad, and then save the file to a secure location. However, AWS also provides you with the option of downloading a .CSV file containing the keys. Ultimately, however, the technique that you use is totally up to you.
Now that we have laid the groundwork for gaining access to S3, it's time to open up Visual Studio and put the necessary pieces into place. I will show you how in Part 2 here.
About the Author
Brien Posey is a 22-time Microsoft MVP with decades of IT experience. As a freelance writer, Posey has written thousands of articles and contributed to several dozen books on a wide variety of IT topics. Prior to going freelance, Posey was a CIO for a national chain of hospitals and health care facilities. He has also served as a network administrator for some of the country's largest insurance companies and for the Department of Defense at Fort Knox. In addition to his continued work in IT, Posey has spent the last several years actively training as a commercial scientist-astronaut candidate in preparation to fly on a mission to study polar mesospheric clouds from space. You can follow his spaceflight training on his Web site.