AWS Step-by-Step
Creating Policies for Amazon S3 Storage Buckets
Amazon Web Services (AWS) makes it relatively easy to set basic permissions on its Simple Storage Service (S3) buckets through the AWS console.
Sometimes, however, you may find that you need more granular control over the bucket permissions than what can be achieved through the basic permission checkboxes. In these types of situations, you can create a bucket policy.
Bucket policies are based around the use of JSON files. Although the AWS documentation does include instructions for creating such a policy file, it can still be somewhat tricky to create a policy file from scratch. Thankfully, you don't have to. AWS provides a policy generator tool that you can use to create the policy for you.
To get started, log in to the AWS console and go into the S3 service. Now, click on the bucket for which you want to create a policy file. When you do, you will see a pop-up appear. As you can see in Figure 1, this pop-up lists the bucket's properties, permissions and management attributes.
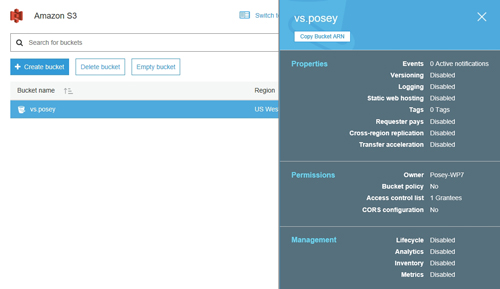 [Click on image for larger view.] Figure 1: The pop-up lists the bucket's properties, permissions and management attributes.
The important thing to pay attention to in the figure above is the Copy Bucket ARN button that appears just beneath the bucket name in the blue section of the pop-up window. The ARN is the Amazon Resource Number. It is essentially a number that identifies the bucket.
So with that said, go ahead and click on the button, and then close the pop-up window.
Now, go to the console's list of services and click on the IAM option, which is listed in the Security, Identity, and Compliance section. When the IAM console opens, click on the Policies option located within the console tree found on the left side of the screen. The resulting screen lists all of the existing policies, as you can see in Figure 2.
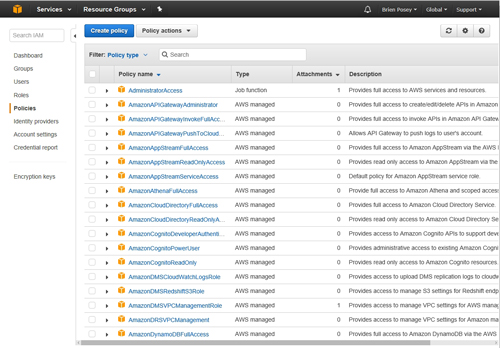 [Click on image for larger view.] Figure 2: The Policies screen lists all of the existing policies.
The next step in the process is to click on the Create Policy button, located at the top of the screen shown in the figure above. This will take you into the Create Policy console. As you can see in Figure 3, the console is divided into three different sections: Copy an AWS Managed Policy, Policy Generator, and Create Your Own Policy.
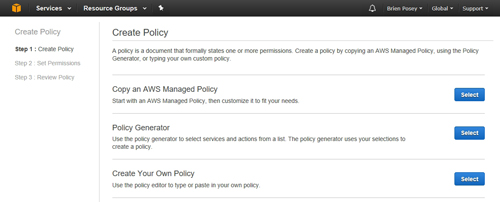 [Click on image for larger view.] Figure 3: The console is divided into three different sections: Copy an AWS Managed Policy, Policy Generator, and Create Your Own Policy.
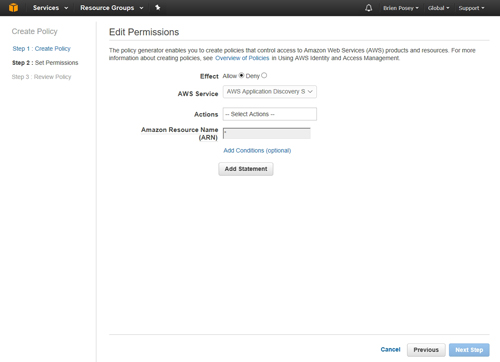
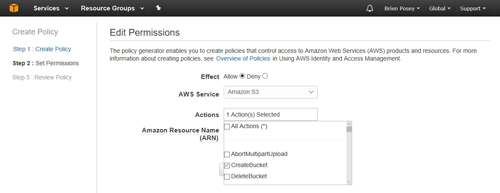
Click the Select button located in the Policy Generator section. This will take you to the Edit Permissions screen, which you can see in Figure 4. This is where you set the various attributes for the policy that you are creating.
 [Click on image for larger view.] Figure 4: You will need to enter your policy criteria into the Edit permissions screen.
The key to using the interface shown in the figure above is to understand that a policy file is made up of a series of statements (although a policy file can contain a single statement). The elements shown in the previous figure are used to form a statement. Therefore, you will need to enter the required information, and then click the Add Statement button. If you need to create additional statements, then you will repeat the process for each statement. When you are done, you can click the Next Step button.
There are four elements that make up a statement. First, there is the effect. The effect determines whether the statement will grant a permission (Allow) or prevent an action (Deny).
The second element is AWS Service. This option allows you to choose which service the statement will pertain to. If you are creating a storage bucket policy, then the AWS Service will need to be set to Amazon S3.
The third attribute is the action. In the case of an S3 bucket, some of the available actions include AbortMultiPartUpload, CreateBucket and DeleteBucket. If you look at Figure 5, you will notice that the Actions menu contains a scroll bar, so there are additional actions available beyond those that you can see in the screen capture.
 [Click on image for larger view.] Figure 5: Choose the actions that you wish to include in the policy.
As you look at the figure above, you can see that I have selected the CreateBucket option. Since the Effect is set to Allow, this statement will allow someone to create a bucket.
Finally, paste the bucket ARN into the Amazon Resource Name field and click the Add Statement button. You should see the statement show up at the bottom of the window.
When you finish adding statements to the policy, click the Next button, and you will see what the policy looks like. Assuming that the policy looks good, assign a more appropriate name to the policy, and then click the Create Policy button. You can see what this looks like in Figure 6.
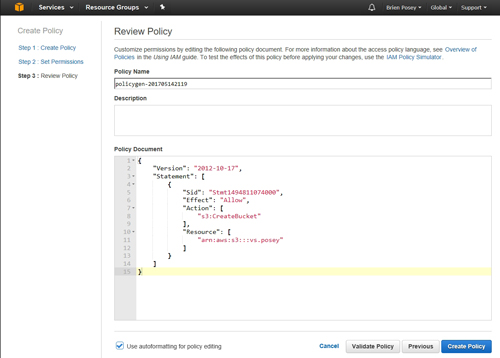 [Click on image for larger view.] Figure 6: This is what a policy looks like.
About the Author
Brien Posey is a 22-time Microsoft MVP with decades of IT experience. As a freelance writer, Posey has written thousands of articles and contributed to several dozen books on a wide variety of IT topics. Prior to going freelance, Posey was a CIO for a national chain of hospitals and health care facilities. He has also served as a network administrator for some of the country's largest insurance companies and for the Department of Defense at Fort Knox. In addition to his continued work in IT, Posey has spent the last several years actively training as a commercial scientist-astronaut candidate in preparation to fly on a mission to study polar mesospheric clouds from space. You can follow his spaceflight training on his Web site.