AWS Step-by-Step
Migrate a Microsoft Azure VM to AWS, Part 1
Just because it's possible to move a virtual machine from Microsoft's cloud to Amazon's, doesn't mean it's easy. In the first installment of this two-part series, Brien identifies what you need to start the process.
Although doing so probably isn't officially sanctioned by Amazon Web Services (AWS) or Microsoft, it is possible to migrate an Azure virtual machine (VM) to AWS.
It is worth noting, however, that there are numerous limitations that you may encounter while doing so. In this two-part series, I will walk you through the process.
Before I begin, I need to point out that this article assumes that you have a Azure account and an AWS account. You will also need an on-premises server running Hyper-V. You will use this server to help prepare the VM once it has been downloaded from Azure.
There are two more very important points that I need to make before getting started. First, if you download a VM from Azure, you will have to make sure that you have a license for that VM's operating system and for any software that may be running on it. That's because we are going to be migrating the VM by using a method called Bring Your Own License.
The other important point is that you are going to have to Sysprep the VM as a part of the migration process. This may impact applications running on the VM. As such, I recommend using lab VMs to get a feel for the process before moving on to any production VMs.
So with that said, let's get started. Begin the process by logging in to the Azure portal and clicking on the Virtual Machines container. Make sure that the VM's status is Stopped, and then click on the VM to access its properties. Now, click on the Disks container, which you can see in Figure 1, and then click on the VM's disk. This will cause the Azure portal to reveal the source image, and the virtual hard disk (VHD) uniform resource identifier (URI), as shown in Figure 2.
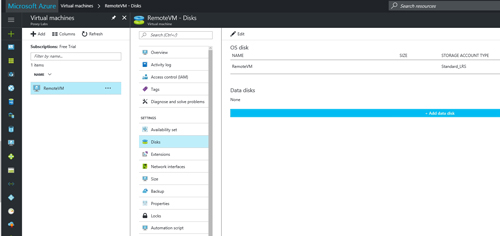 [Click on image for larger view.] Figure 1: Click on the VM's Disks container.
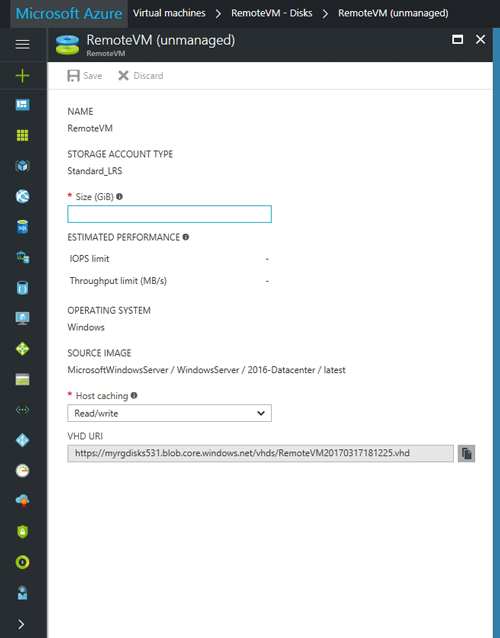 [Click on image for larger view.] Figure 2: Click on an individual disk to access its information.
Now, go back to the Azure portal's main menu and click on the Storage Accounts container, followed by the storage blob containing the VM's virtual hard disk. The storage blob name is included in the disk's URI. Now, click on the Blobs button, followed by the VHDs option, and then click on the VHD that belongs to the VM that you want to migrate. With the VHD file selected, click on the Download link, which you can see in Figure 3. Keep in mind that the download process will take quite a while to complete, because the default VHD size in Azure is 127GB.
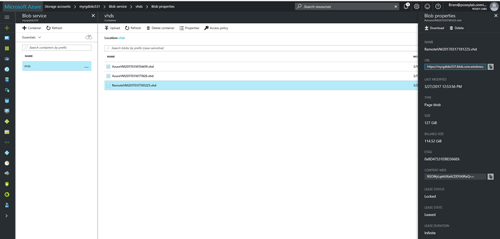 [Click on image for larger view.] Figure 3: Select the VHD file, and then click on the download button.
I have always believed in being straight with my readers, so I want to tell you up front that while writing this article, I was unable to download an Azure VM. I live in a rural area and my Internet connection is not always the most reliable. After spending 36 hours attempting download after download, only to have my connection drop, I was forced to abandon my efforts. As such, the screen captures used throughout the rest of this series are based on a VM that I created locally and configured to match an Azure VM as closely as possible.
Because Azure VHD files are so large, and because AWS charges its customers based on the storage space that they consume and the volume of data transferred, it is a good idea to convert the VM's VHD to a dynamically expanding VHD prior to uploading it to AWS. AWS supports fixed-length and dynamically expanding VHD files, but dynamically expanding VHD files are usually the smaller file type.
The Hyper-V Manager contains a tool that you can use to convert the VHD. Open the Hyper-V Manager and click on the Edit Disk link, found in the console's Actions pane. This causes Hyper-V to launch the Edit Virtual Hard Disk Wizard. Click Next to bypass the wizard's Welcome screen. The next screen that you will see is the Locate Virtual Hard Disk screen. Click the Browse button, and then select the VHD that you have downloaded.
Click Next, and you will be taken to the Choose Action screen. Make sure that the Convert option is selected, and then click Next. The following screen asks if you want to convert the virtual disk to VHD or to VHDX format. You must choose the VHD option. Click Next again, and you will see the screen asking you if you want to create a disk of a fixed size or a dynamically expanding disk. Choose the Dynamically expanding option, as shown in Figure 4, and then click Next.
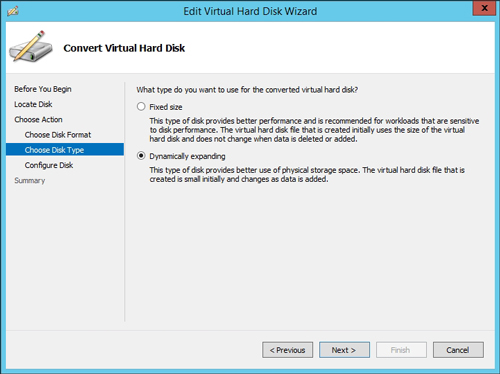 [Click on image for larger view.] Figure 4: Choose the Dynamically Expanding option and click Next.
Now, just specify a path and filename for the virtual disk, and click Finish. It takes a little while to do the conversion, but the space savings are typically worth the time spent. If you look at Figure 5, for example, you can see that my VHD was reduced from over 70GB in size to just over 6GB in size.
 [Click on image for larger view.] Figure 5: The VHD size was reduced.
That's going to do it for Part 1. In Part 2, I will show you how to prepare the VHD for use with AWS, and how to create an AWS instance based on the VHD's contents.
About the Author
Brien Posey is a 22-time Microsoft MVP with decades of IT experience. As a freelance writer, Posey has written thousands of articles and contributed to several dozen books on a wide variety of IT topics. Prior to going freelance, Posey was a CIO for a national chain of hospitals and health care facilities. He has also served as a network administrator for some of the country's largest insurance companies and for the Department of Defense at Fort Knox. In addition to his continued work in IT, Posey has spent the last several years actively training as a commercial scientist-astronaut candidate in preparation to fly on a mission to study polar mesospheric clouds from space. You can follow his spaceflight training on his Web site.