AWS Step-by-Step
Creating a Virtual Private Cloud on AWS
VPCs are relatively easy to set up in AWS, although they usually require a significant degree of configuration afterward. Brien walks you through the steps.
Infrastructure as a Service (IaaS) clouds are often categorized as one of three types: public, private, or hybrid. There is, however, a fourth type -- the virtual private cloud (VPC).
In the case of Amazon Web Services (AWS), a VPC is essentially an isolated virtual segment that exists within the AWS cloud. The most common use for AWS VPCs is probably that of exposing resources (such as Web servers) to the Internet. After all, it would be a bad idea to allow public Internet traffic to flow through a subnet that contains your private back end resources.
AWS makes it relatively easy to create a VPC, although there is usually a significant degree of configuration required after a VPC has been put into place. For example, you will probably need to create a virtual firewall (which AWS refers to as a security group).
To create a VPC, log in to the AWS console, and then click on the VPC link within the list of services. The link is located in the Networking and Content Delivery section. Upon doing so, AWS will open the VPC Dashboard, which you can see in Figure 1.
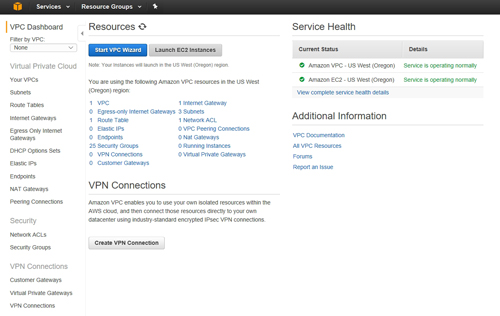 [Click on image for larger view.] Figure 1: This is the VPC dashboard.
As you look at the figure above, notice that the Resources section indicates that one VPC already exists. This is the default VPC. For the purposes of this article, I am going to show you how to create an additional VPC that is isolated from the default VPC.
Click on the Start VPC Wizard button shown in Figure 1, and AWS will prompt you to select a VPC configuration. As you can see in Figure 2, the wizard provides you with four different choices, including:
- VPC with a Single Public Subnet
- VPC with Public and Private Subnets
- VPC with Public and Private Subnets and Hardware VPN Access
- VPC with a Private Subnet Only and Hardware VPN Access
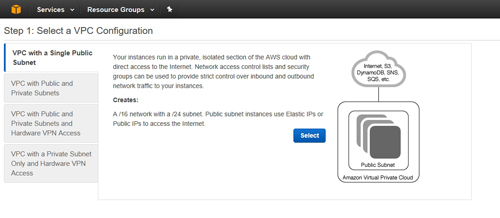 [Click on image for larger view.] Figure 2: AWS allows you to choose between four different types of virtual private clouds.
In the real world, you would choose a VPC type based on whether you need publicly accessible subnets, private subnets, VPN access or some combination of the three. The remaining configuration tasks vary depending on which option you choose. For the purposes of this article, I will walk you through the process of creating a simple VPC with a single public subnet.
Choose your VPC type and then click the Select button, shown in Figure 2 above. Assuming that you opted to create a VPC with a single public subnet, the next screen that you see will ask you to provide some basic information about the VPC that you want to create.
The first thing that you will need to do is to provide a Classless Inter-Domain Routing (CIDR) block. By default, AWS is configured to create an IPv4 CIDR block, specified as 10.0.0.0/16. This block type allows for the creation of 65,531 IP addresses.
In case you are wondering, AWS does allow for the creation of IPv6 CIDR blocks, but the IPv6 option is disabled by default. If you do opt to use IPv6, then AWS will provide the CIDR block for you (as opposed to you entering the block specifications). You can see the CIDR block choices in Figure 3.
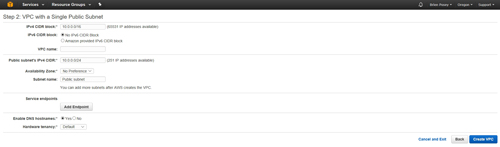 [Click on image for larger view.] Figure 3: AWS requires you to provide several pieces of information that will be used in the creation of the VPC.
The next thing that you will need to do is to provide a name for the VPC that you are creating. AWS allows for the creation of multiple VPCs, and therefore uses names to differentiate between VPCs. The VPC Name field is located just beneath the CIDR block option.
The next thing that you will need to provide is the CIDR for the public IP address. The options that you are given vary depending on whether you decided to use an IPv4 or an IPv6 CIDR. As you can see in Figure 3, the public subnet defaults to using 10.0.0.0/24 (with 251 addresses available).
You will also need to provide an availability zone for the subnet. Remember that any instances that you create on the subnet later on will need to be in the same zone. While you are at it, you will also have to provide a name for the subnet. This is to help you to differentiate between subnets since you will be able to create additional subnets later on.
The last thing that you will have to do is to decide whether or not you want to enable DNS hostnames and whether you want to use the default hardware tenancy, or use dedicated hardware.
The next step in the process is to add a service endpoint. To do so, click the Add Endpoint button. When you do, the window will expand to display the options shown in Figure 4. As you can see in this figure, you must choose the service availability zone, the subnet to which the endpoint should be applied, and the policy. You can go with the default Full Access policy, or you can create your own.
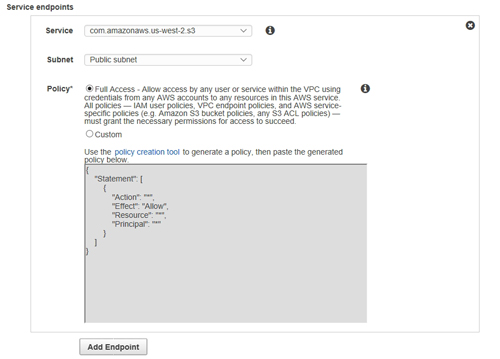 [Click on image for larger view.] Figure 4: You will need to populate the Service Endpoint options.
When you are done, click the Create VPC button to create the VPC.
As you can see, it is relatively easy to create a virtual private cloud, but you should create a VPC security group before putting the VPC into use. I plan to discuss VPC security groups in a future column (read it here).
About the Author
Brien Posey is a 22-time Microsoft MVP with decades of IT experience. As a freelance writer, Posey has written thousands of articles and contributed to several dozen books on a wide variety of IT topics. Prior to going freelance, Posey was a CIO for a national chain of hospitals and health care facilities. He has also served as a network administrator for some of the country's largest insurance companies and for the Department of Defense at Fort Knox. In addition to his continued work in IT, Posey has spent the last several years actively training as a commercial scientist-astronaut candidate in preparation to fly on a mission to study polar mesospheric clouds from space. You can follow his spaceflight training on his Web site.