AWS Step-by-Step
Load Balancing a Web Application in Amazon EC2
Workload scaling and load balancing are core functions of Amazon's flagship cloud service. Brien walks you through the process of creating and configuring a load balancer in AWS.
One of the great things about Amazon Web Services Inc. (AWS) is that it allows workloads to be scaled on an as-needed basis.
Not only does AWS allow you to scale workloads, but you can use auto-scaling to configure the minimum number of workload instances that should ever be running. The auto-scaler is even able to detect unhealthy instances and replace them.
As you would probably expect, scaling and load balancing are functions of the Amazon Elastic Compute Cloud, or EC2. As such, you will need to open the EC2 console. Next, click on the Load Balancers option in the navigation pane, and then click on the Create Load Balancer button, shown in Figure 1.
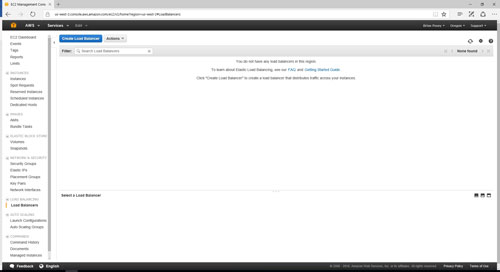 [Click on image for larger view.] Figure 1: Click the Create Load Balancer button.
At this point, the console will display the Define Load Balancer page. As you can see in Figure 2, you will need to assign a name to the load balancer, and you will also need to select an Amazon Virtual Private Cloud, or VPC, within which to create a load balancer. As you work through the load balancer creation process, be sure to leave the Listener Configuration set to HTTP. You may also have to select the subnets that will be used by your load balancer, but this is only necessary if you perform an advanced configuration or use a non-default VPC.
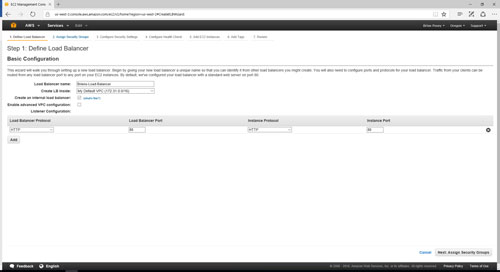 [Click on image for larger view.] Figure 2: This screen defines the basic load balancing configuration.
As you look at the screen capture above, you will notice an option to create an internal load balancer. Load balancers are considered to either be internal- or Internet-facing. An Internet-facing load balancer has a public IP address and a publicly resolvable DNS name.
Click Next, and you will be prompted to choose a security group to assign to your load balancer. Although you must make an initial selection, your choice is not permanent, and you can move the load balancer to a different security group at any time.
Click Next, and you will be taken to the Configure Security Settings screen. This screen's contents will vary depending on the configuration options that you initially entered. If, for example, you choose to create an HTTP listener but not an HTTPS listener, then you will see a warning message telling you that you need to go back to the first step if you plan to use HTTPS or SSL traffic with the load balancer.
After completing any required security configuration settings (there might not be any), click Next and you will be taken to the Configure Health Check screen. This screen allows you to define what it means for the workload to be healthy. For example, you can perform an HTTP ping on Port 80 to test whether the Web server is responding to requests. There are also a number of threshold values that you can set, as shown in Figure 3, but the default values are typically going to be OK.
 [Click on image for larger view.] Figure 3: You can determine how the load balancer tests the health of your Web application.
Click Next, and you will be taken to a screen that prompts you to add EC2 instances to the load balancer. This screen, which you can see in Figure 4, lists all running EC2 instances. In this particular screen capture, I only have a single instance running, but typically you would see more than one instance displayed. You must select the check boxes corresponding to the instances that you wish to add to the load balancer.
 [Click on image for larger view.] Figure 4: Select the instances that should be load-balanced.
This screen also contains check boxes that you can use to determine whether cross-zone load balancing and connection draining should be enabled (you can also configure the connection draining threshold time). Both of these options are enabled by default.
Click Next, and you will be taken to the Add Tags screen. Tagging provides a way for you to identify the load balancer that you are creating. This is especially helpful in large organizations that may have numerous load balancers. Tags consist of a key, which acts like a name, and a value. You can use any key/value combination that makes sense for your organization.
Now, click on the Review and Create button. Doing so will take you to a screen that displays all of the configuration options that you have chosen. Take a moment and review these options. Assuming that everything appears to be correct, then you can click the Create button to create the load balancer. You can see what this looks like in Figure 5 below.

[Click on image for larger view.] Figure 5: Click Create to create the load balancer.
About the Author
Brien Posey is a 22-time Microsoft MVP with decades of IT experience. As a freelance writer, Posey has written thousands of articles and contributed to several dozen books on a wide variety of IT topics. Prior to going freelance, Posey was a CIO for a national chain of hospitals and health care facilities. He has also served as a network administrator for some of the country's largest insurance companies and for the Department of Defense at Fort Knox. In addition to his continued work in IT, Posey has spent the last several years actively training as a commercial scientist-astronaut candidate in preparation to fly on a mission to study polar mesospheric clouds from space. You can follow his spaceflight training on his Web site.